
|
Who's There? Firewall Advisor User's Guide Advanced Topics |
 |
|
|
Who's There? Firewall Advisor User's Guide Advanced Topics |
|
DoorStop X's logging feature allows you to create a log of all allowed accesses through DoorStop, all denied access attempts, or both. The log file is useful to see who has attempted to access what services, and spot possible security violations, particularly if you're using Open Door's Who's There? Firewall Advisor. Logging of both allowed and denied connections is enabled by default.
To change logging settings, choose "Preferences" from the DoorStop X menu. The Preferences dialog appears as shown below in Figure 1.
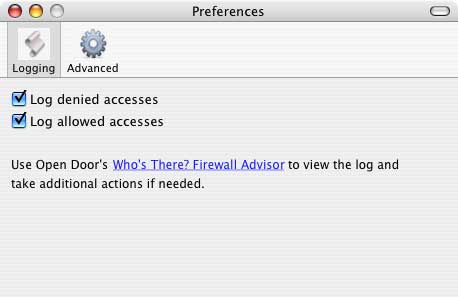
Figure 1. Logging Dialog
To enable or disable logging, click the Logging icon if it's not selected, and then check or uncheck the appropriate checkbox. Logging and service protection are not independent of one another. If you are logging denied accesses, or allowed, or both, and then make DoorStop inactive, all logging will cease until DoorStop is made active again.
The log file name is "WhosThere.log" (for use with Open Door's Who's There? Firewall Advisor), and it is written to the directory /Library/Preferences. The log file is described in detail in the Log File Format appendix. To view DoorStop's log, choose "View Log" from DoorStop's Log menu. If you've installed Open Door Networks' Who's There? Firewall Advisor, that application will launch, displaying the log file and other valuable information; otherwise, the Console application will launch and display the log file. See the Reading the Log File appendix for details of how to use DoorStop's log file to spot possible security violation attempts.
Resetting the log file (12, Features)
The Log menu provides for resetting the log file, and various ways of viewing the log.
Although DoorStop's log file becomes more useful the bigger it gets, it can become so large that it's difficult to work with. Consequently, you may want to reset DoorStop's log file periodically, to keep it from getting too big. To reset DoorStop's log file, choose "Reset Log..." from the Log menu, bringing up the dialog shown in Figure 2.
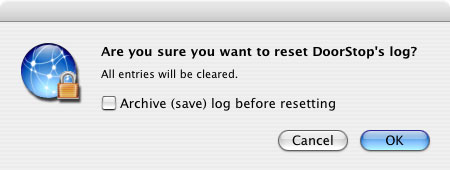
Figure 2. Reset Log dialog
If you do not check the checkbox, clicking OK will simply clear the current log file, and all current data in the file will be lost. If you want to save current data in the log file and start a new log, check the checkbox and then click OK. Old data may be useful in the future for looking back at security violations that you weren't even aware of at the time. The current log file is renamed by inserting a number (e.g. WhosThere 1.log) and then creating a new WhosThere.log.
Viewing the log file
DoorStop X can display information about the log file, and it can also invoke Who's There?, if installed, to display log lines or summaries of log lines. Note that doing so requires Who's There? 2.0 or later.
DoorStop X fully protects TCP ports, which are used by almost all Macintosh Internet services. There are certain services, however, which use an alternate protocol called UDP. In almost all cases, little security will be gained by protecting these services. However, in certain limited situations, there may be some reason to do this. UDP is a relatively simple protocol, but is used for many normal day-to-day Internet operations on the Macintosh, such as:
Most users will not need to use UDP protection. If there is a specific security advantage in protecting UDP ports on your machine, however, choose Preferences from the File menu. The preferences dialog appears as shown below in Figure 3.
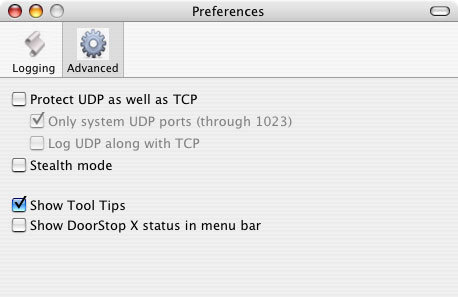
Figure 3. Preferences dialog
To enable UDP protection, click the Advanced icon if it's not already selected, then check the "Protect UDP as well as TCP" checkbox. DoorStop will ask you if you want to create entries to allow access to the four UDP services mentioned above in this section. You should click "Don't add" only if you understand the consequences of doing so. Likewise, if you disable UDP protection, DoorStop will ask if you want delete the entries added previously for the four UDP services mentioned above. You should decline only if you understand the consequences. Note that enabling UDP protection will cause UDP-specific entries to appear in DoorStop's Service Information list.
If you check the "Log UDP along with TCP" checkbox, DoorStop will log UDP access attempts in the same way that it logs TCP access attempts. For example, if in the Logging pane of DoorStop's preferences you have checked "Log denied access" but not "Log allowed access", then DoorStop will log in that way for both TCP and UDP -- if you've checked the "Log UDP along with TCP" checkbox. If you leave the box unchecked, no UDP logging will be done.
In most cases, you will want to protect only UDP ports up through 1023. These low-numbered UDP ports are used for standard services, such as DNS, DHCP, Bonjour and NTP (described above). Higher-numbered ports are used dynamically by certain UDP services such as DNS; denying access to high-numbered ports will effectively disable such services, since there is no way to know ahead of time which ports will actually be used by a given service.
Once you enable UDP protection, it works much like TCP protection. DoorStop uses exactly the same service list for UDP as it does for TCP. Normally a particular service uses either a TCP or a UDP port, but DoorStop will actually protect both types of ports for a given service (if UDP protection for that port is active). The exact details of the protection are specified in the right pane of the Setup window.
One way that UDP protection differs from TCP protection is that UDP is not a connection-based protocol. With TCP, DoorStop can allow or deny just connection attempt packets, and not worry about the packets after the connection has been established. With UDP, DoorStop must allow or deny every packet destined for a particular service. It must therefore not block just incoming connections attempts -- it must block all communications associated with the service.
Additional differences with UDP relate to logging. Since UDP is connectionless, DoorStop will log every single UDP packet for active ports that it is protecting (if the appropriate options have been configured through the Preferences dialog). You may wish to not log allowed accesses if you have enabled UDP protection, due to the number of log entries that could be generated.
Stealth mode (12, Configuring a Personal Firewall)
Although the term "stealth mode" has various meanings, it generally refers to a machine configured to not respond to network events as it normally would. A common example is the blocking of ICMP pings, which are often used by hackers to detect the presence of a machine at a particular IP address. Normally, when a machine receives a ping, it replies to the sender. If the machine does not reply, the sender is led to believe that there is no machine at the IP addresses which they're pinging. Hiding your machine's presence on the Internet is in some ways good from a security standpoint, because if a hacker thinks that your machine is not online, they may not make further attempts to access it. But most hackers are now aware that firewalls can block pings, so blocking them often accomplishes little. Additionally, pings are also used as part of everyday network operations, like verifying that machines on your network are still online. In general, stealth mode should be enabled only by advanced users, and only when absolutely necessary. If it is enabled, blocked ICMP pings are logged if logging of denied access attempts is enabled.
When moving the cursor over certain parts of DoorStop X's various windows, popups appear with text explaining the function of the particular window item. These popups are called Tool Tips. They are enabled by default, but can be turned off in the Advanced pane of DoorStop's Preferences window by unchecking the "Tool Tips in DoorStop windows" checkbox.
Using the status icon
You can choose to enable a DoorStop status item on the right side of the menu bar, which will be available at all times, even if the DoorStop X application is not running. Using this item, you can quickly:
To enable the status item, go to the Advanced pane of the Preferences dialog (Figure 3 above) and then check "Show DoorStop X status in menu bar". The status icon is shown in Figure 4.
![]()
Figure 4. DoorStop X status icon
Testing DoorStop X (12, Testing a Personal Firewall)
For added security, you may want to test DoorStop X, to ensure that you've made the proper settings for the services you want to protect. This is done by having another machine attempt to access services on your machine. There are several ways to do this:
Note that third-party security-checking services often report your machine's responses to pings (see "Stealth mode" above) as a security problem. As explained above, however, responding to pings may be needed for normal day-to-day network operations. Unless you understand the ramifications of using stealth mode, you should not enable it, and should not be concerned with the reporting of response to pings as a security problem.
What clients will see
If an access attempt is denied by DoorStop X, the error message displayed on the client will depend on the client application being used. In general the error message will be the same as if the client attempted to connect to a machine on which the desired service was not actually running. For instance the OS X AppleShare client (the Finder's Go -> Connect to Server menu item) will eventually time out and display the message "Connection failed. No response from the server. Please try again." Web browsers will display an error message such as "A connection failure has occurred".
Uninstalling DoorStop X
If you want to turn off DoorStop X's protection, you need only click the Stop button in DoorStop's Setup window. If you wish to remove DoorStop's files from your hard drive, however, you can choose "Uninstall DoorStop X..." from the DoorStop X menu. Doing so will remove files associated with DoorStop, but not the log file or the application folder itself (or its contents). Note that after uninstalling DoorStop, the next time you run it, you will be asked to authenticate, and DoorStop will not be enabled (you can enable it by clicking the Start button in DoorStop's Setup window). After uninstalling DoorStop, you may wish to drag the DoorStop X folder to the trash. Also, if you intend to use another firewall after uninstalling DoorStop, you should confirm the other firewall is actually running and providing protection.
An uninstall option also appears on the DoorStop X splash screen when the evaluation period has expired.
Update information
To see if you're using the latest version of DoorStop X, choose "Update Information" from the "DoorStop X" menu. This will launch your Web browser and take you to the DoorStop X updates page, where you can compare the latest version number with that which you're currently using.
![]() Back to Table of Contents
Back to Table of Contents
![]() Back to Accessing Internet Security for Your Macintosh
Back to Accessing Internet Security for Your Macintosh
![]() Forward to Troubleshooting
Forward to Troubleshooting